Docverse

Help Center

Everything you need to run document control in Docverse.

Step-by-step guides for every part of the workspace, from creating your first project to issuing a transmittal and getting it approved.

Getting started

Create your account, find your way around and set up your first project.

Create your account and sign in

Sign up with your work email or Google, confirm your email and sign in.

  1. 1

    Open the sign-up page

    Click Get started in the top navigation, or go to /signup directly.

  2. 2

    Enter your details

    Fill in the Create your account form, then click Create Account.

    • Full name
    • Work email
    • Password: at least 8 characters, with an uppercase letter, a lowercase letter and a number
    • Confirm password

    Prefer not to use a password? Click Continue with Google instead.

  3. 3

    Confirm your email

    We send a confirmation email to the address you used. Open it and click the link to activate your account before signing in.

  4. 4

    Sign in

    Go to /login, enter your Work email and Password, and click Sign In. You land on your dashboard Home.

  5. 5

    Forgot your password?

    On the sign-in page, click Forgot password?, enter your work email and click Send reset link. Open the email link, then set a new password under Settings → Account → Password & Security.
Find your way around the dashboard

What each part of Home and the sidebar is for.

  1. 1

    Home

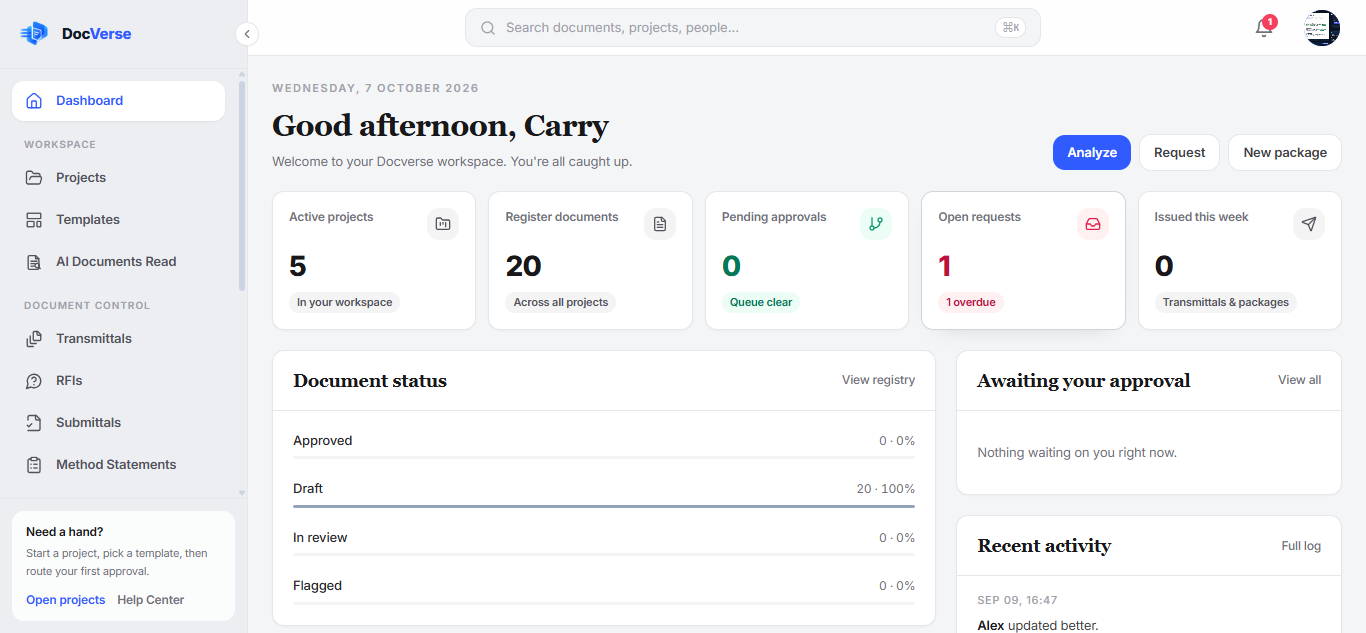
    Home greets you and shows what needs your attention: key numbers, document status, items awaiting your approval, upcoming reviews and recent activity.

    The dashboard Home page
    Home shows your workload at a glance.
  2. 2

    The sidebar

    Everything in the workspace is one click away from the sidebar, grouped by purpose:

    • Workspace: Projects, Templates and AI Documents Read (the AI document analyzer)
    • Document Control: Transmittals, RFIs, Submittals and Method Statements
    • Workflow: Approvals and Requests
    • Collaborate: Teams, AI Assistant and Integrations
    • Account: Settings

    Use the arrow on the edge of the sidebar to collapse it into icons and give yourself more room.

Create your first project

Projects hold your document register, team and approvals.

  1. 1

    Open Projects

    In the sidebar, click Projects, then click New project.

  2. 2

    Fill in the project details

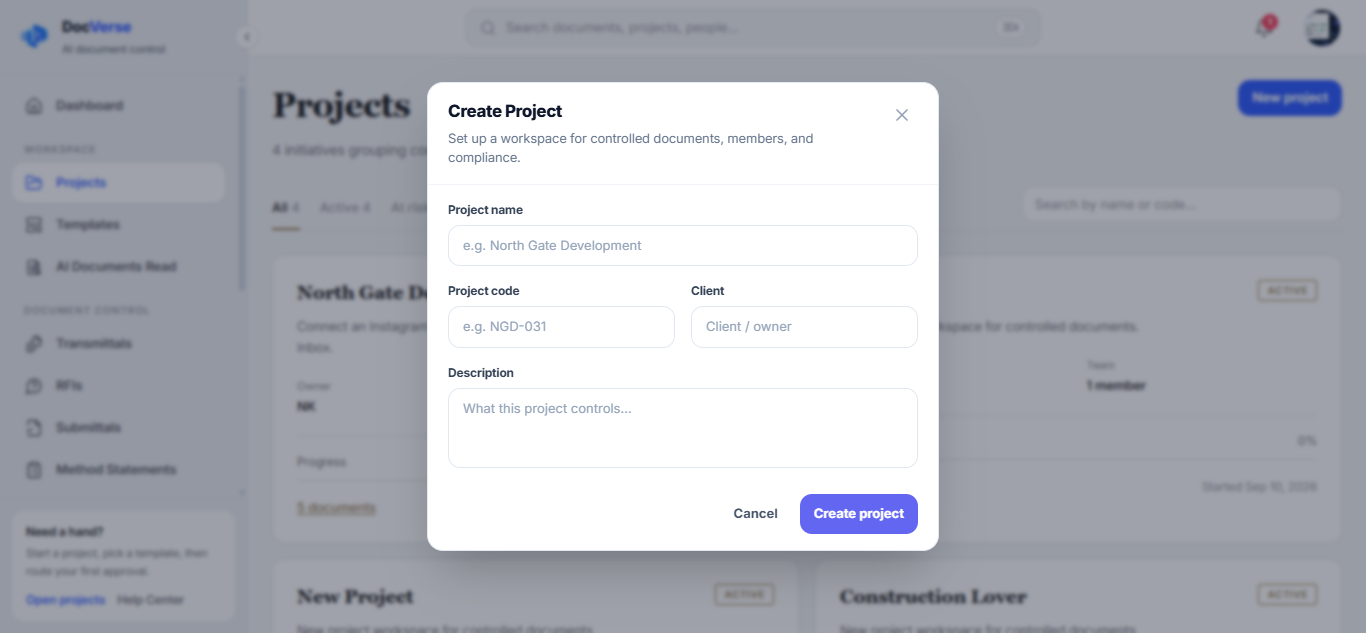
    Complete the Create Project form and click Create project.

    • Project name (required), for example North Gate Development
    • Project code (required), for example NGD-031. The code appears in document numbers and URLs.
    • Client: the client or owner
    • Description: what this project controls
    The Create Project form
    Project name and code are required.
  3. 3

    Open the project workspace

    The project opens automatically. Its document register lists every document, and you can filter it by All, Draft, Packages, AI or Manual, or search by ID, title or owner.

Invite your team and assign roles

Bring in colleagues and control who can edit, review or only view.

  1. 1

    Open the project team

    On a project page, click Team. Only a Project Owner or Project Manager can invite and manage members.

  2. 2

    Invite by email

    Under Invite by email, enter your colleague’s email, choose the scope and a role, then click Invite.

    • This project only: they join just this project
    • All projects: they join every project in your organization

    If the email can’t be delivered, the invitation link is copied to your clipboard so you can share it yourself.

  3. 3

    Or add someone already in your organization

    Under Add from organization, pick the teammate, choose a role and click Add.

  4. 4

    Your colleague accepts

    They open the invitation link and click Accept invite. If they don’t have an account yet, they can click Create account and are brought back to the invitation afterwards.

  5. 5

    Manage members

    In Active members you can change someone’s role or remove them. In Pending invitations you can copy the link, resend or revoke an invitation.

    See Project roles in the reference section below for what each role can do.

Creating documents

Write from scratch, generate with AI, start from a template and export.

Create a document in a project

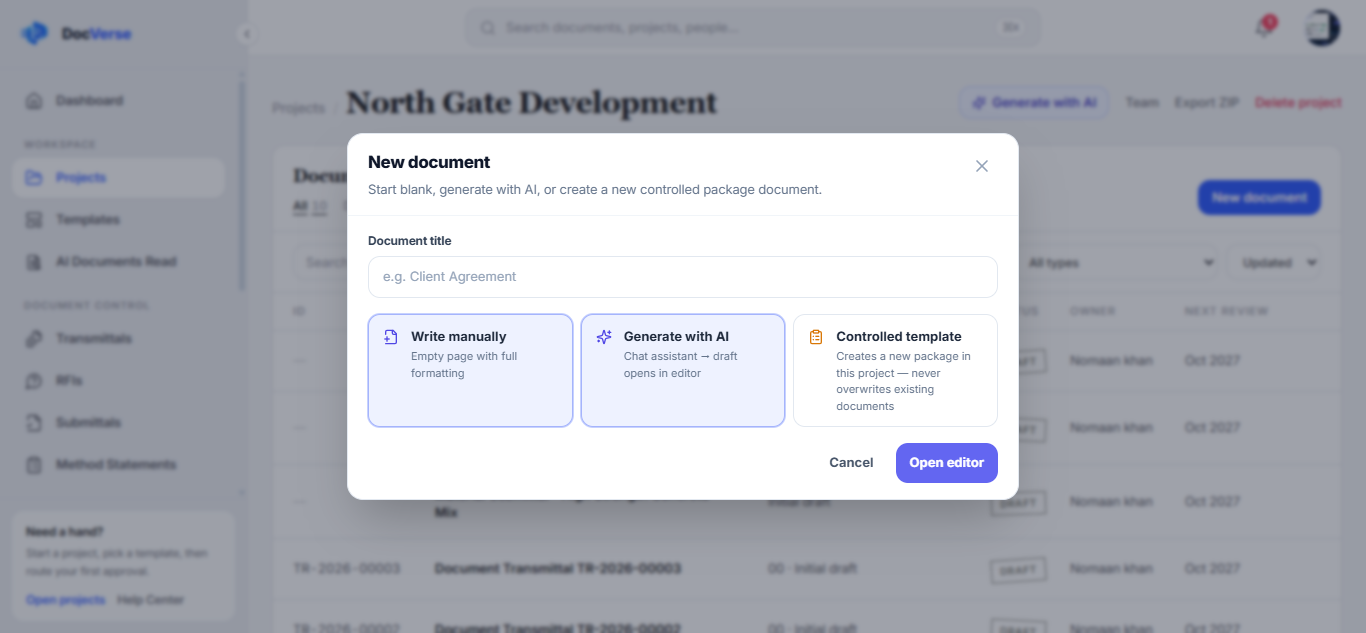
Three ways to start: write manually, generate with AI or use a controlled template.

  1. 1

    Start a new document

    Open a project and click New document. Give it a Document title.

  2. 2

    Choose how to start

    Pick one of the three options:

    • Write manually: opens an empty page in the editor
    • Generate with AI: answer a few questions (document type, tone and details) and the AI Document Assistant writes a first draft
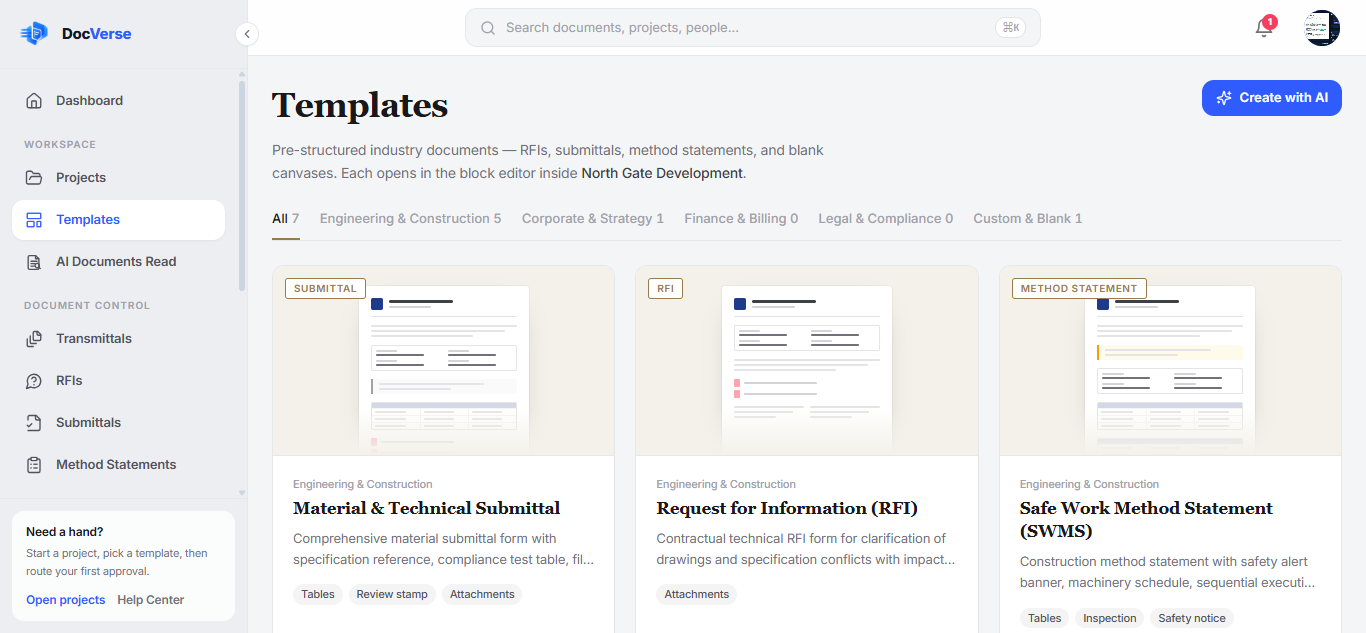
    • Controlled template: start from a Document Transmittal, RFI, Material Submittal or Method Statement (RAMS)

    A controlled template always creates a new document. It never overwrites an existing one.

    The New document dialog with its three options

Edit, save and export a document

Build documents from blocks, save your work, commit versions and export.

  1. 1

    Add content blocks

    Open the Elements drawer and add the blocks you need.

    • General: Text, Heading, Table, Image, Signature, Checklist, Chart, Timeline, Attach File, Table of Contents, Header, Footer, Page Number and more
    • Construction: Submittal Stamp, RFI Query & Response, BOQ / Rate Schedule, QA/QC Inspection Form, Daily Site Log, Drawing Register, NCR Defect Report, Site Instruction and more
  2. 2

    Save and commit versions

    Click Save to keep your changes. When a draft is ready, click Commit version to record a new version in the document history.

    Undo with Ctrl+Z and redo with Ctrl+Y. Click Preview to see the finished layout.

  3. 3

    Export or print

    Click Export and choose a format:

    • PDF
    • Word (.docx)
    • PNG or JPEG image
    • HTML
    • Print Document
    • JSON: a raw backup of the document

Analyze a document with AI

Upload any document and get a summary, key dates, requirements and issues.

  1. 1

    Open the analyzer

    In the sidebar, click AI Documents Read.

  2. 2

    Upload a file

    Drop your file into the upload area or click Select file to analyze. PDF, DOC, DOCX, TXT, XLS and XLSX files up to 5 MB are supported.

  3. 3

    Review the results

    When the analysis completes, the results are organized into tabs:

    • Quick Summary (switch between Quick, Detailed and Executive modes)
    • Key Information
    • Important Dates
    • Key Requirements
    • Potential Issues
    • Important Sections
    • Document Overview
  4. 4

    Ask questions about the document

    Type a question in plain language, such as “What are the important deadlines?”. Answers cite the pages they came from, so you can check the source.

    AI can make mistakes. Always check important details against the original document.

Reviews and document control

Send documents for review, approve them, issue packages and request documents.

Send a document for review

Route a draft to reviewers with a purpose, priority and due date.

  1. 1

    Open the document

    Open the document in the editor and click Send for review.

  2. 2

    Fill in the review request

    Complete the form and click Send for review.

    • Subject (required)
    • Purpose: For Review, For Approval, For Information, For Comment or Revision Check
    • Priority: High, Medium or Low
    • Due date
    • Message to reviewers
    • Reviewers: tick the project members who should review

    No reviewers listed? Invite a Document Controller or Reviewer to the project first.

  3. 3

    Track progress

    The button changes to In review while the document is with reviewers. You can follow it on the Approvals page under Waiting.

Review and approve documents

Act on documents waiting for you and record a decision.

  1. 1

    Open Approvals

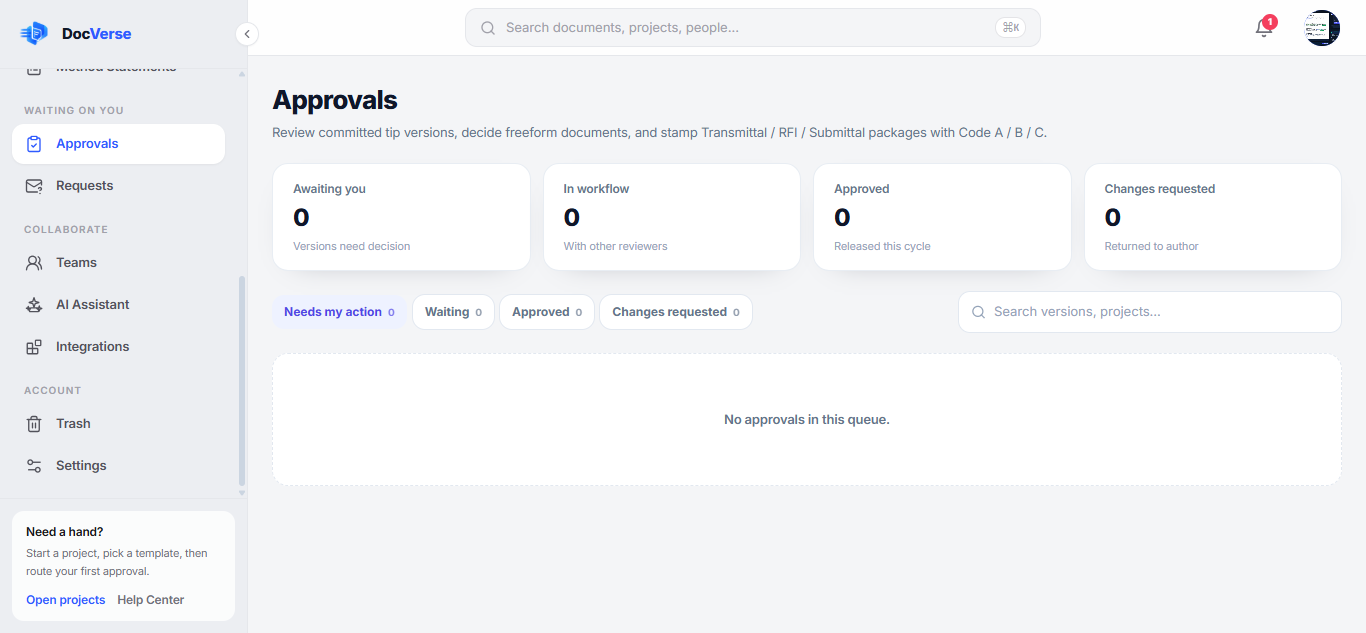
    In the sidebar, click Approvals. The Needs my action tab lists everything waiting on you. Other tabs show Waiting, Approved and Changes requested items.

    The Approvals page
  2. 2

    Review the document

    Each card shows the version, purpose, due date, who sent it and the reviewers. For project documents, click Compare versions to see what changed since the last version.

  3. 3

    Record your decision

    Add a note if needed, then choose a decision:

    • Project documents: Approve, Approve with comments, Revise & resubmit or Reject
    • Packages (transmittals, RFIs, submittals): Code A — Approve, Code B — Approve with comments, or Code C — Revise & resubmit

    A decision note is required for Code B, so the sender knows what to address.

Issue a transmittal, RFI, submittal or method statement

Prepare a controlled package, issue it and get it stamped.

  1. 1

    Create the package

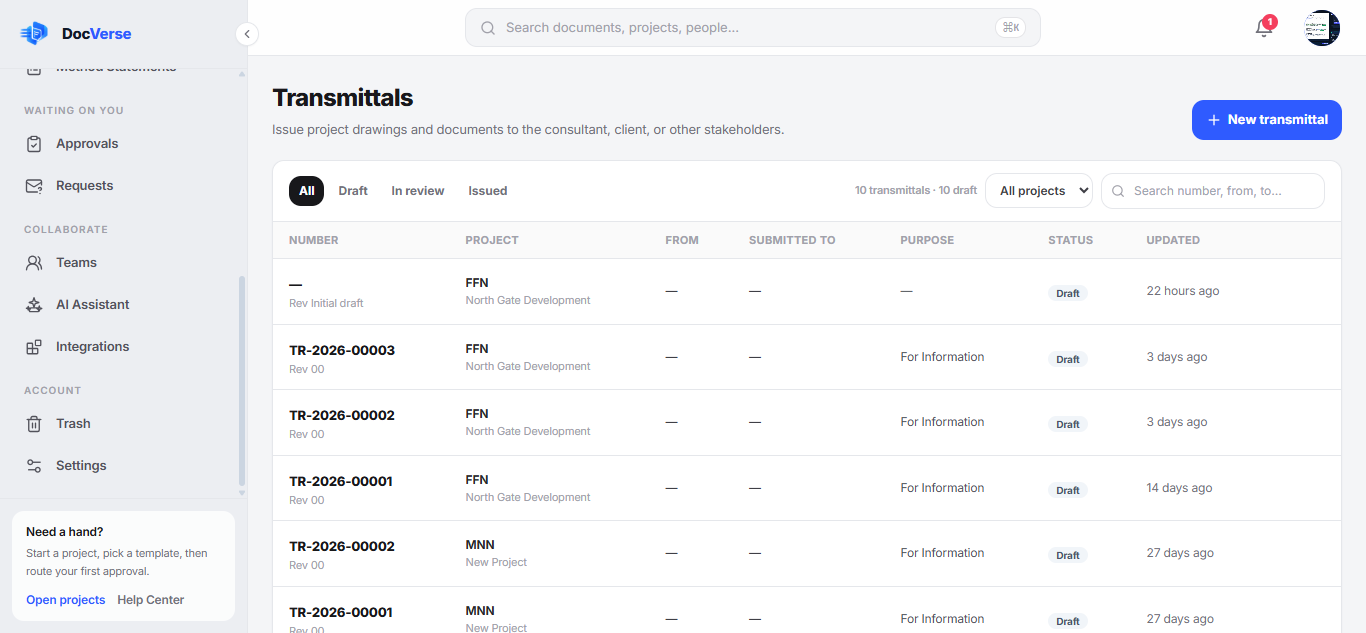
    In the sidebar under Document Control, open Transmittals, RFIs, Submittals or Method Statements. Click the New button (for example New transmittal), select a project and click Create and open.

    The Transmittals list
  2. 2

    Fill in the sheet

    Complete the header fields (Project, number, From, To, Date, Revision, Attention, CC), then add each document to the schedule with Add Document.

    • Choose the Purpose of issue, for example For Approval or For Construction
    • Write a cover note
    • RFIs, submittals and method statements have their own extra sections. Method statements include a hazard analysis with Add hazard.
  3. 3

    Save and commit

    Click Save Draft as you work, and Commit to record a version in the commit history.

  4. 4

    Issue the package

    Click Issue package. Any missing required fields are highlighted and must be fixed first. Once issued, the package is locked and appears in Approvals.

  5. 5

    Get it stamped

    A reviewer stamps it Code A, B or C in Approvals. After the decision you can edit and re-issue it if needed. Use Download PDF to share a copy.

Request documents from others

Ask a subcontractor or colleague for a document and track it.

  1. 1

    Create a request

    In the sidebar, click Requests, then New Request. You can also click Request on Home.

  2. 2

    Fill in the request

    Complete the form and click Send request.

    • Document title and project
    • Document type: Certificate, Contract, Drawing, Report, Project document or Other
    • Link project document (optional): the next version number is suggested for you
    • Request from: the email of the person who should send it
    • Due date, priority and expected version
    • Message
  3. 3

    Follow up

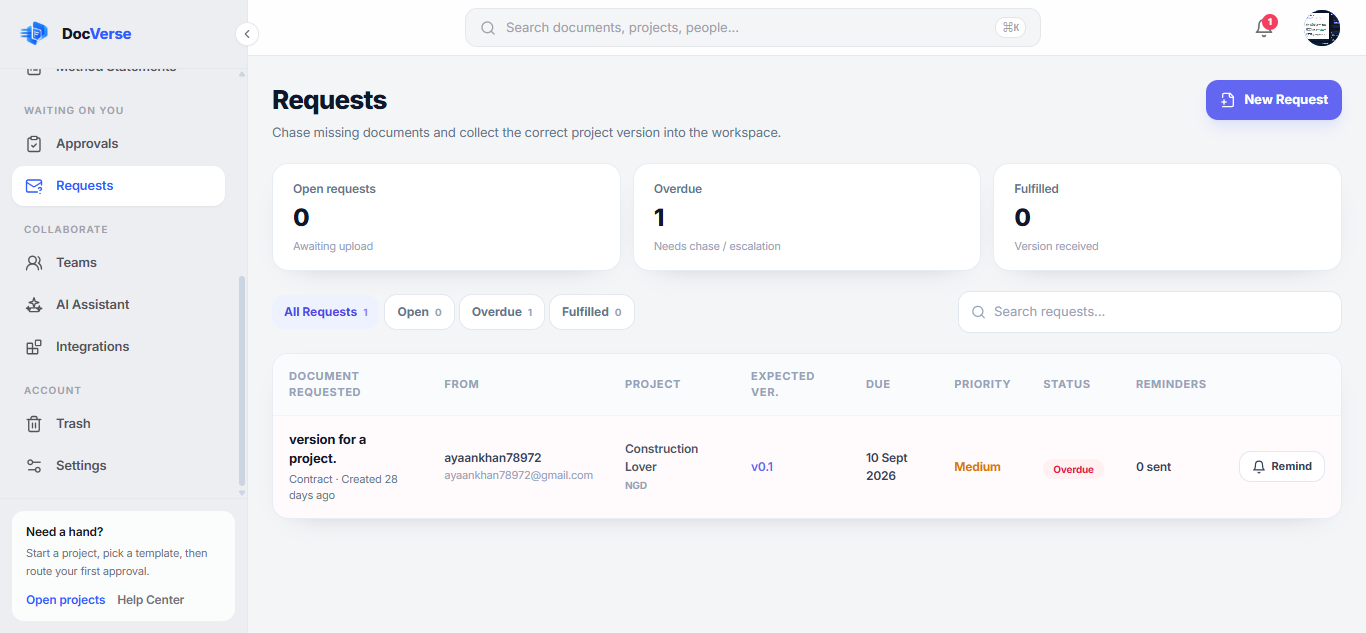
    Track requests under the Open, Overdue and Fulfilled tabs. Click Remind to send a reminder. The number of reminders sent is shown on each request.

    The Requests page with Open, Overdue and Fulfilled tabs

Assistant, integrations and settings

Get help from AI, connect your tools and manage your account.

Ask the AI Assistant

Get quick answers about approvals, requests and projects.

  1. 1

    Open the assistant

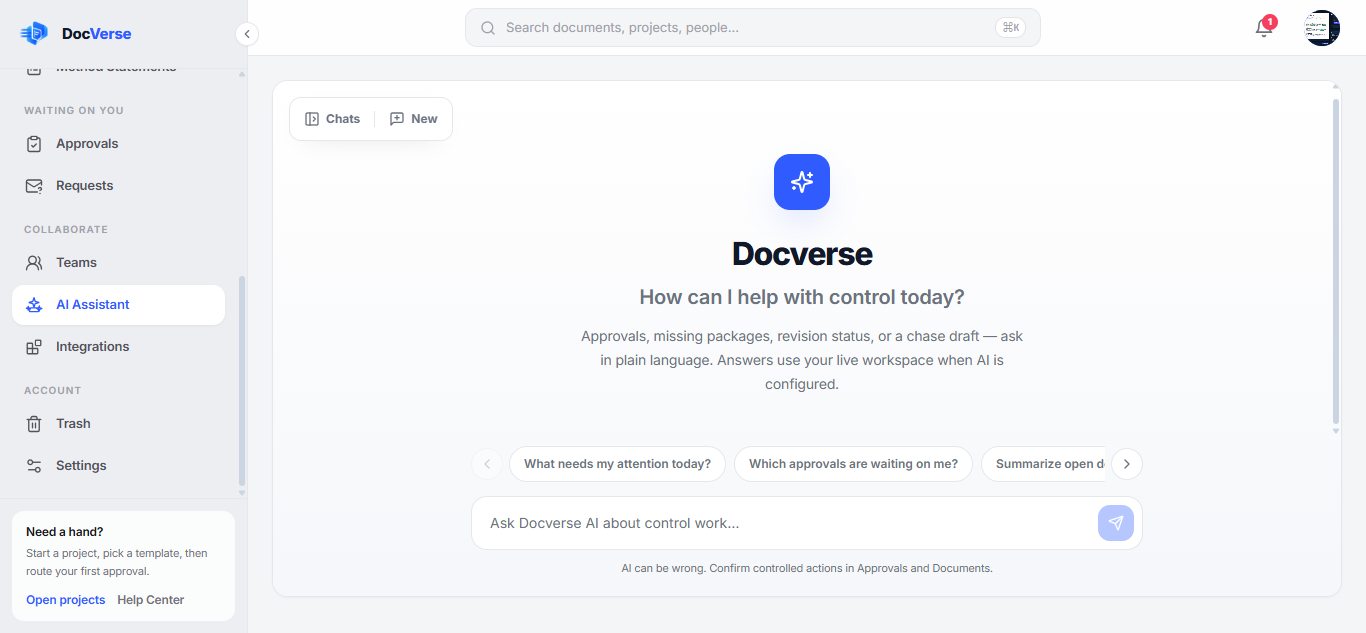
    In the sidebar, click AI Assistant, then type a question or pick a suggestion.

    • What needs my attention today?
    • Which approvals are waiting on me?
    • Summarize open document requests
    • Draft a chase note for an overdue request
    • Which projects look at risk?
    The AI Assistant chat
  2. 2

    Manage conversations

    Click New chat to start fresh. Earlier conversations are listed on the left.

    The assistant doesn’t take controlled actions for you. Approve, issue and register documents in Approvals and Documents.

Connect Microsoft 365

Link your workspace’s Microsoft 365 account.

  1. 1

    Open Integrations

    In the sidebar, click Integrations.

  2. 2

    Connect

    On the Microsoft 365 card, click Connect and sign in with your Microsoft work account. If the card shows "Reconnect needed", click Reconnect and sign in again. Click Disconnect at any time to remove the connection.

    Google Drive, Slack and DocuSign are coming soon.

Manage your account and organization

Profile, password, notifications, organization members and billing.

  1. 1

    Account

    Under Settings → Account, update your photo, name, email and job title, then click Save Changes. Change your password under Password & Security.

  2. 2

    Organization

    Under Organization, admins can edit company details, invite members by email with an organization role, change roles and revoke pending invitations.

  3. 3

    Billing

    Compare the Free, Starter, Pro and Business plans, switch between monthly and yearly billing, and manage payment methods and invoices.

Reference

Roles, statuses and codes used across Docverse.

Project roles

Roles are set per project on the project Team page.

Project Owner
Full control of the project. Every project needs at least one owner.
Project Manager
Manages the team, edits documents and drives approvals.
Document Controller
Edits documents, commits versions and submits them for approval.
Developer
Edits documents and commits versions.
Reviewer
Reviews documents and records approval decisions. Cannot edit content.
Viewer
Read-only access to documents and their history.

Document statuses

Where a document is in its lifecycle.

Draft
Being written or edited. Not yet sent for review.
In review
Sent to reviewers and waiting for a decision.
Changes requested
A reviewer asked for revisions before it can be approved.
Approved
Accepted by the reviewers.
Issued
Formally issued to the recipient.

Review codes

Used when stamping transmittals, RFIs and submittals.

Code A
Approved as submitted.
Code B
Approved with comments. A note explaining the comments is required.
Code C
Revise and resubmit.

Document number prefixes

Controlled packages are numbered automatically.

TR
Transmittal
RFI
Request for Information
SUB
Material Submittal
MS
Method Statement (RAMS)

Frequently asked questions

Do I need to install anything?+

No. Docverse runs in your web browser. There is nothing to download or install.

Is there a free trial?+

Docverse has a Free plan instead of a time-limited trial. You can use it for as long as you like with no credit card, and upgrade to a paid plan when you are ready. Billing starts on the day you upgrade.

Can people outside my company work on a project?+

Yes. Invite them to a single project with “This project only”, and give them a role such as Reviewer or Viewer so they only see and do what they need to.

Which file types can the AI analyzer read?+

PDF, DOC, DOCX, TXT, XLS and XLSX files up to 5 MB.

Is my data used to train AI models?+

No. Your documents are processed only to deliver results inside your workspace. See the Security page for details.

Still need help?

Can’t find what you’re looking for? Our team is happy to walk you through it.

Contact support